Creating a dirt bike-themed cake can be an exciting project, especially for enthusiasts of off-road adventures or motocross. Whether you're preparing for a birthday party or a special occasion for a dirt bike enthusiast, this guide will walk you through the steps to craft a stunning dirt bike cake that looks as good as it tastes.
Gathering Your Supplies
Before diving into the baking and decorating process, ensure you have all the necessary supplies. You'll need:
- Cake Ingredients: Prepare your favorite cake mix or recipe along with required ingredients like flour, sugar, eggs, and butter.
- Cake Pans: Choose the appropriate cake pans for your design. Rectangular or round pans work well for creating the base shape.
- Frosting: Gather frosting in various colors for decorating.
- Food Coloring: Have gel or paste food coloring to achieve vibrant colors.
- Decorating Tools: Get piping bags, spatulas, and cake decorating tools.
- Fondant: Optional but useful for creating intricate details.
- Dirt Bike Model or Toy: A small dirt bike toy for reference.
Baking the Cake
- Prepare and Bake: Follow your chosen cake recipe. Bake the cakes and allow them to cool completely before decorating.
- Level and Stack: Level the cakes if necessary. Stack and layer them with frosting in between to create the base structure of the cake.
Designing the Dirt Bike
- Sketch the Design: Visualize the dirt bike shape you want. Use a clean surface to sketch out the dirt bike's form and placement on the cake.
- Cutting and Carving: Using the sketch as a guide, cut the cake into the desired dirt bike shape. Carve the cake to refine the shape, making sure to round edges and create a realistic form.
Decorating the Cake
- Crumb Coat: Apply a crumb coat of frosting over the cake to seal in crumbs and create a smooth surface.
- Base Coat: Use colored frosting to coat the cake, mimicking the colors of a dirt bike.
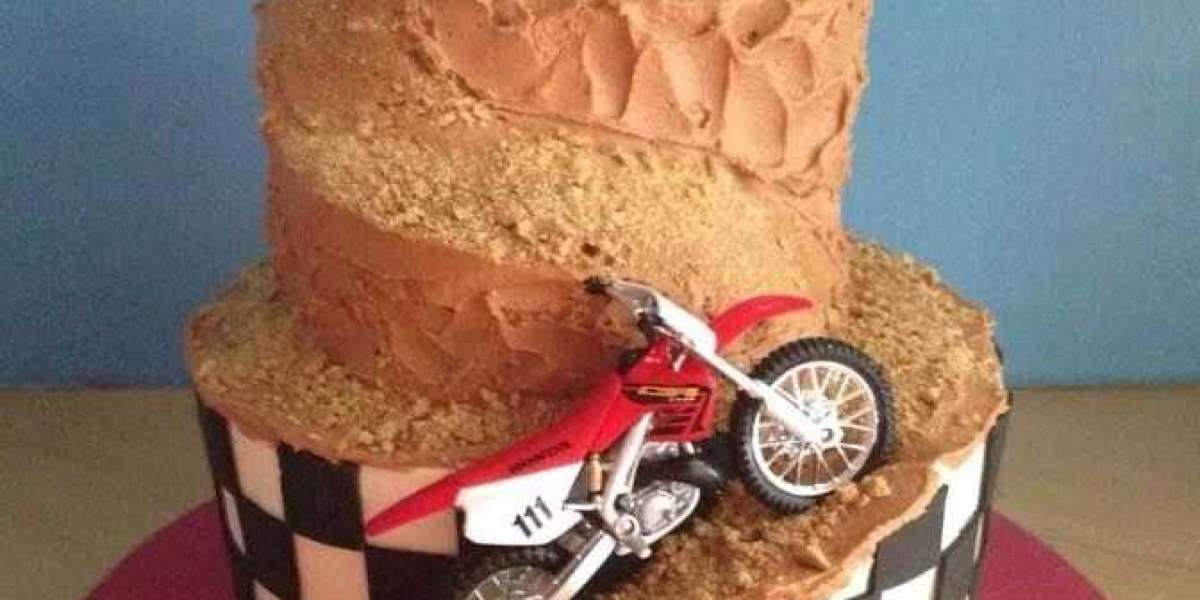
- Details with Fondant: Roll out fondant to create small details like wheels, handlebars, and the rider. Use food coloring to paint details on these fondant pieces.
- Assembling the Bike: Place the fondant pieces onto the cake, assembling the dirt bike according to your design.
Adding Final Touches
- Terrain Details: Create a realistic dirt or terrain effect around the bike using crushed cookies or brown sugar.
- Texturing and Accents: Use frosting to add texture and details to the dirt bike and its surroundings.
- Personalization: Write a message or add a name to personalize the cake.
Presentation and Enjoyment
Once the cake is decorated to your satisfaction, carefully transfer it to a serving platter or cake stand. Display the dirt bike cake proudly at your celebration and watch as guests admire your creation. Be sure to take plenty of photos before cutting into the cake to preserve the memory of your hard work.
Conclusion
Crafting a dirt bike cake requires patience and attention to detail, but the results are well worth the effort. With this guide, you're equipped to create a show-stopping cake that will thrill any dirt bike enthusiast. So, gather your supplies, unleash your creativity, and enjoy the process of bringing this delicious and exciting design to life!